AUGUSTAIR
SERVICE BULLETIN SB2009-1
Revision B
Initial Release Date: 3 November 2009
Revision A Date: 15 January 2010
Revision B Date: 2 February 2010
Subject: Vertical Stabilizer Spar Inspection, Repair and Reinforcement.
SECTION 1. Planning Information
A. Effectivity:
(1) Morrisey 2150, Shinn 2150A, Varga 2150A, Varga 2150 ATG, Varga 2180 and Varga 2180TG
B. Reason
(1) Cracked or broken vertical stabilizer front spar and/or loose or missing fasteners at the bend in the spar where it attaches to the fuselage FS 193.06 bulkhead (See Figures 1, 2 and 3) due to Metal Fatigue caused by repeated operational loads. The spar flanges are notched to facilitate the bend. The notches are spanned by splice straps. These detail design features of the spar bend design (including tolerances) induce stress concentrations due to the interaction of the flange notch and the flange bend radius that may not be entirely mitigated by the splice straps.
(2) Cracks may occur at or near the flange notch root propagating across the spar web or up the flange bend radius. In addition, redistribution of internal loads due to a cracked or broken spar may cause fasteners attaching the splice straps to loosen.
C. Description
Augustair recommends a detailed visual and dye-penetrant inspection of the front spar near the bend, and incorporation of a spar web doubler either as a repair or as a preventative alteration in accordance with the instructions in Section 2 of this Service Bulletin unless the inspection and repair or alteration incorporating the spar web doubler described in Section 2.B. has already been accomplished and approved by the FAA.
(1) Preliminary Inspection for security and condition of the vertical stabilizer attachment in accordance with Section 2.A.
a. If the preliminary inspection indicates damage or looseness, then accomplish the Detail Inspection and Repair or Alteration in accordance with Section 2.B. before further flight.
b. If the preliminary inspection does not reveal damage or looseness, then accomplish the Detail Inspection and Repair or alteration in accordance with Section 2.B. within 10 hours time in service from the time of the preliminary inspection.
Note : The preliminary inspection is insufficient to find and repair all fatigue cracks in this area. If the vertical stabilizer is damaged to the extent that it is noticeably loose in the preliminary inspection, then further flight, even a ferry flight, is strongly discouraged. If no damage is evident in the preliminary inspection, then a ferry flight or normal operations for a very short time (up to 10 hours time in service) is permissible. The preliminary inspection may be omitted if the detail inspection and repair / alteration is done immediately.
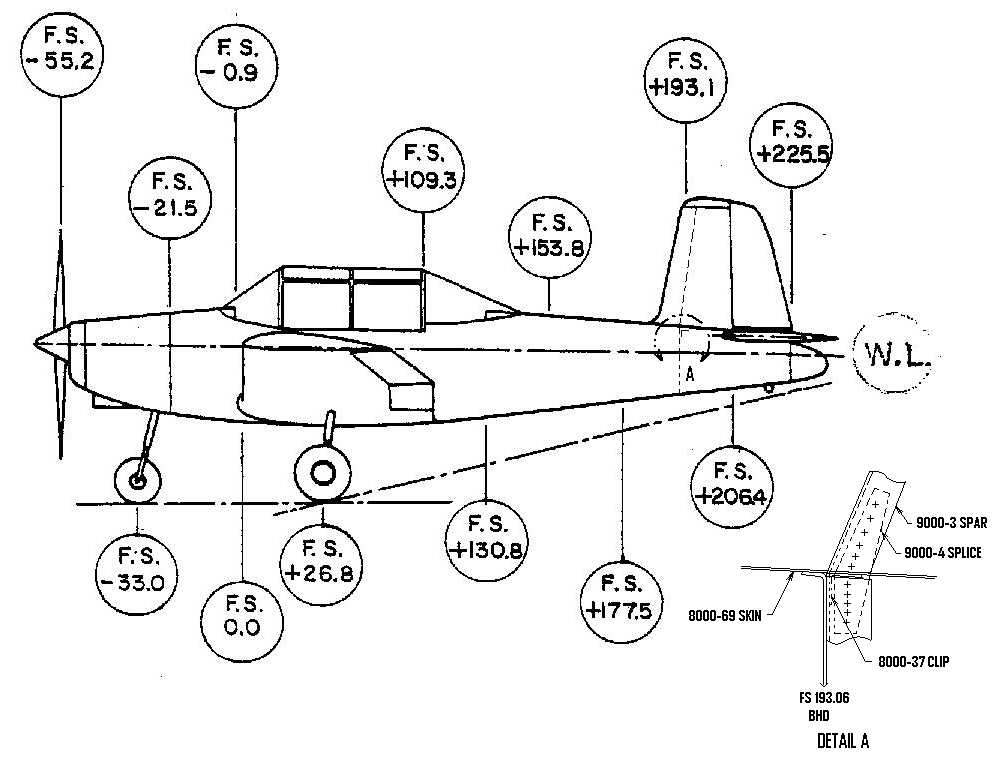
Figure 1
Figure 2
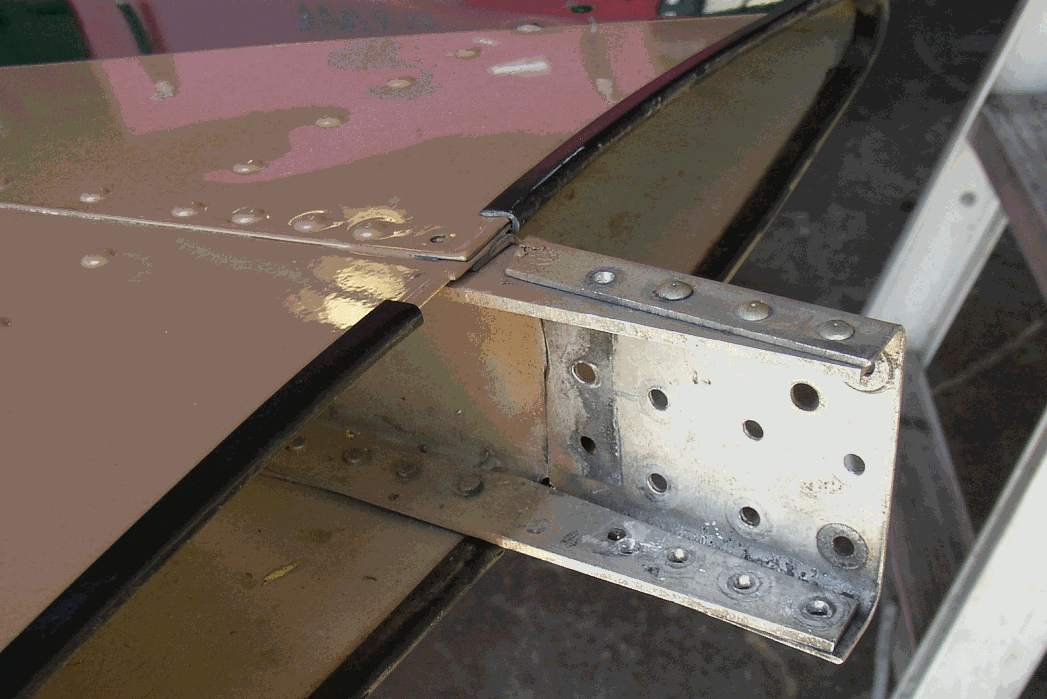
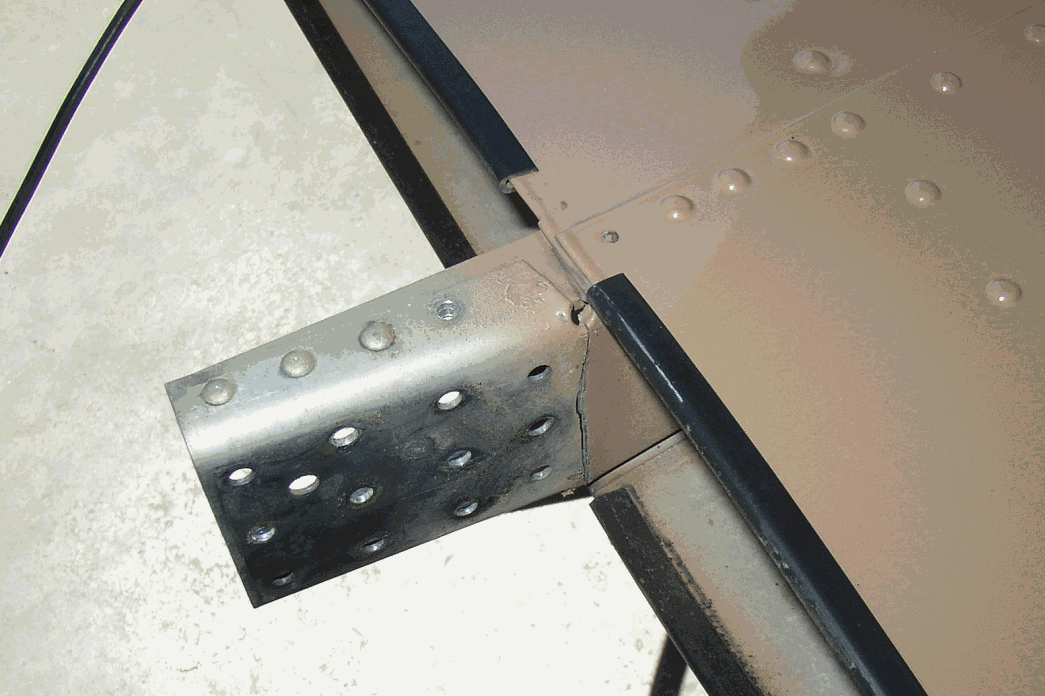
Figure 3
D. APPROVAL
The EFFECTIVITY information in Section 1.A(1) and the technical content of ACCOMPLISHMENT INSTRUCTIONS of Section 2. of this service bulletin are FAA approved.
E.COST
Estimated costs for implementing the inspections and repairs or alterations are:
Workhours Materials
(1) Preliminary Inspection 1.0
Σ 1.0
(2) Detail Inspection and Repair or Alteration
a. Remove Vertical Tail 2.75
b. Inspect 1.0 dye penetrant
c. Fabricate and Install Doubler 2.0 0.090 clad 2024
2024-T3 al alloy
Corrosion preventative finish
d. Reinstall removed structure 7.0 miscellaneous
e. Checks and reinstall access 1.5
Σ 14.25
F. CORRESPONDENCE
(1) Augustair, Inc.
1809 Heph. McBn. Rd.
Hephzibah, GA 30815
(2) Varga type club: The VG21 Squadron
SECTION 2. Accomplishment Instructions
A. PRELIMINARY INSPECTION
(1) Before further flight unless an approved repair/alteration consistent with the installation of the repair or alteration doubler in Section 2.B has already been accomplished, or if the Detail Inspection and Repair or Alteration in Section 2.B is elected to be accomplished before further flight.
(2) Hand Check Security of Vertical Tail
a. With the airplane parked and secured, push by hand laterally to the left and to the right on the vertical tail at least 1 foot above the fuselage with sufficient force to rock the airplane slightly to moderately.
b. If any evidence of looseness or relative motion between the vertical tail and the fuselage is observed, then proceed to Detail Inspection and Repair or Alteration in Section 2.B. before further flight.
c. If no evidence of looseness or relative motion between the vertical tail and the fuselage is apparent, then perform Visual Inspections in Section 2.A.(3).
(3) Visually Inspect the Vertical Tail Front Spar at Fuselage Penetration
a. Access through vertical stabilizer seal
i. Temporarily remove/dislodge the rubber/plastic seal at the base of the vertical tail sufficiently to visually inspect the vertical tail front spar at the intersection with the fuselage.
ii. Using a flashlight and other aids as appropriate, visually inspect for cracks in the spar web and splice plates and for loose, missing or otherwise damaged fasteners. Figures 2 and 3 above depict the area to be inspected (after tail removal and cleanup). With the seal partially removed some of this region may be sufficiently visible if paint over-spray and sealant permit.
iii. If damage is detected or if sealant or paint overspray obscures the area so as to prevent close visual inspection, then proceed to Detail Inspection and repair or Alteration in Section 2.B. before further flight.
iv. If sealant and/or paint overspray does not obscure the area and a close visual inspection does not reveal damage, then proceed to 2.B.(3)b. visual inspection with access through the Rudder/Elevator Access Panel.
b. Access through the Rudder/Elevator Access Panel
i. Remove the access panel on the fuselage side panel (Figure 4, Item 17).
ii. Visually inspect areas at the attachment of the vertical tail forward spar to the FS 193.06 bulkhead for cracks, loose or missing fasteners, evidence of chaffing or relative movement and corrosion using a flashlight (and mirrors as required). A boroscope, or other magnifier, or other aids may optionally be used.
iii. If damage or severe corrosion is detected or if sealant or paint overspray obscures the area so as to prevent close visual inspection, then proceed to Detail Inspection and Repair or Alteration in Section 2.B. before further flight.
iv. If damage is not revealed and corrosion is mild, moderate or none, then optionally:
(1) Proceed to Detail Inspection and Repair or Alteration in Section 2.B, or
(2) Replace the access panel and rubber/plastic seal at the base of the vertical tail and perform Detail Inspection and Repair or Alteration in Section 2.b. within 10 hours time in service after this inspection.
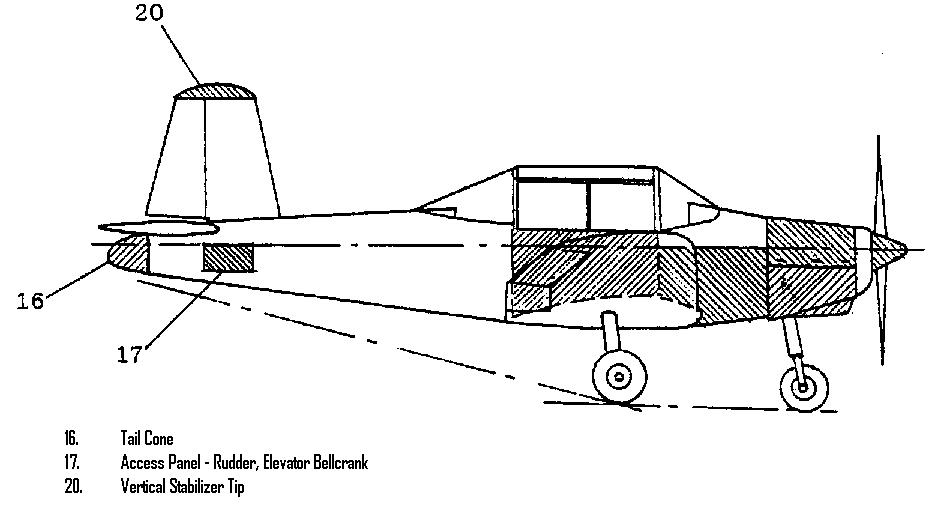
Figure 4
B. DETAIL INSPECTION AND REPAIR OR ALTERATION
(1) Unless
a. the inspections describe below have already been accomplished and the repair / preventative modification (alteration) doubler described below has been installed or
b. an approved repair or alteration accomplishing the intent this Service Bulletin has been installed:
If the Preliminary Visual inspection in Section 2.A reveals damage or is optionally skipped, then before further flight perform the close visual and dye-penetrant inspections and fabricate and install a spar web repair or preventative modification doubler as described below before further flight.
If the Preliminary Visual Inspection in Section 2.A is performed and does not reveal damage, then perform the close visual and dye-penetrant inspections and fabricate and install a spar web repair or preventative modification doubler as described below within 10 hours time in service after the Preliminary Inspection.
(2) Remove the Vertical Stabilizer:
Note: Vertical Stabilizer removal and installation is addressed in the Varga Kachina 2150A Aircraft Maintenance Manual Section 4.4.4.1 which may be used to supplement the following instructions.
Note: The Maintenance Manual paragraph 4.4.4.1 vertical stabilizer removal requires removing the rudder in accordance with paragraph 4.4.3.1, which requires removing the horizontal stabilizer in accordance with paragraph 4.4.2.1, which requires removing the elevator in accordance with paragraph 4.4.1.1. However, the elevator and horizontal tail may be removed as an assembly after disconnecting the controls in accordance with the instructions below.
a. Gain Access, Remove the Tailcone, Disconnect Controls and Optionally Remove the Elevator:
i. Remove the access panel from fuselage right hand side (Figure 4, Item 17).
ii. Remove the fiberglass tail cone (Figure 4, Item 16) disconnecting the tail light wire at the knife splice (Figure 5).
iii. Remove two AN3 bolts attaching the elevator horn to control tube connection (Figure 6)
iv. Disconnect the rudder cables from the rudder bell-crank (Figure 7) two places. Temporarily replace the hardware in the bell-crank to avoid loss of the bushings (figure 7, Item 7)
v. Remove the 2 AN3 bolts attaching the elevator static balance weights to the elevator bell-crank, remove the weight assemblies. (Figure 6).
vi. Optionally, for ease of rudder removal, remove 2 AN3 bolts attaching the rudder static balance weight from the horn (Figure 7), remove the weight.
vii. Optionally, support the elevator, remove 3 AN3 hinge bolts and remove the elevator.
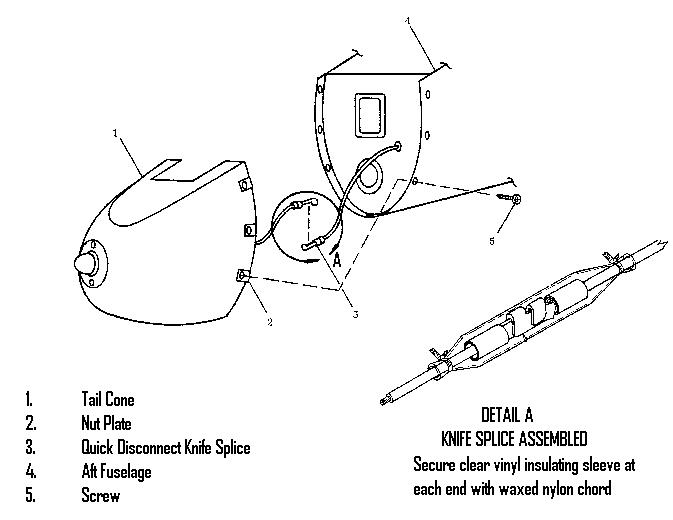
Figure 5

Figure 6
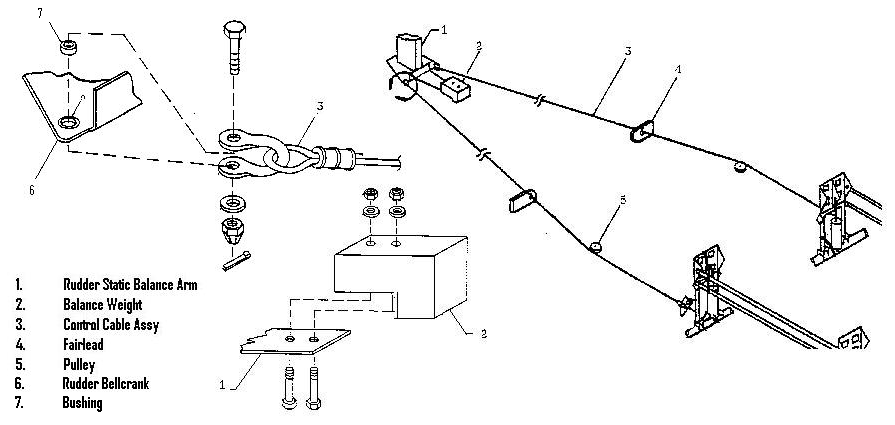
Figure 7
b. Remove the Horizontal Stabilizer
i. Remove the horizontal stabilizer attach hardware at 4 locations on the underside of the stabilizer (Figure 8).
ii. Support and remove the stabilizer (or the stabilizer and elevator as an assembly if the elevator was not removed in step a.) by lifting up and sliding aft.
iii. After moving the stabilizer to clear attachment angles, temporarily re-insert the bolts to retain the fixed spacers between the stabilizer surfaces (Figure 8, Item 9).
iv. If the Tail Light wire impedes removal, it is permissible to cut the wire.
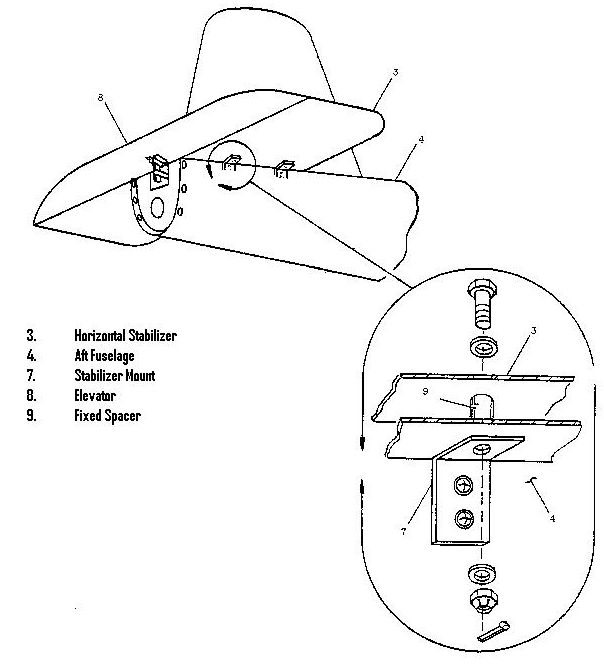
Figure 8
c. Remove the Rudder:
i. Remove the Vertical Stabilizer Tip.
ii. Support the rudder, remove the hinge bolts (2 hinges) and remove the rudder.
d. Remove the Vertical Stabilizer
i. Disconnect the VOR Antenna cable if installed. It is permissible to cut the cable.
ii. Support the vertical stabilizer and remove the fasteners attaching the vertical stabilizer front spar to the FS 193.06 bulkhead (Figure 9). In some models these are 12 NAS 1103-3 bolts. In others they are rivets. If rivets are installed, then carefully drill-out rivets using guidance in AC 43.13-1B, paragraph 4-52.b.
iii. To facilitate removal of the vertical tail, the 8000-37 clip (Figure 9, Item 11) attaching between the spar and the 8000-69 fuselage skin at the top of the FS 193.06 bulkhead may be optionally removed at this point. Carefully drill out the 3 AN470 rivets attaching the clip to the skin and remove the clip.
iv. Remove fasteners attaching the vertical stabilizer aft spar to the FS 206.38 fuselage bulkhead and to the 8000-8 horizontal bulkhead (Figure 9). On some models these are 6 NAS 1103-3 bolts (spar to FS 206.38 bulkhead) and 4 NAS 1103-2 (spar to the 8000-8 horizontal bulkhead). On others these are rivets. If rivets are installed, then carefully drill-out rivets using guidance in AC 43.13-1B, paragraph 4-52.b.
v. Attachment bolts are different lengths, mark them for re-installation. Subsequent installation of a front spar web doubler will require longer bolts for attaching the front spar to the FS 193.06 bulkhead.
vi. If the Tail Light wire impedes removal, it is permissible to cut the wire.
vii. Remove the vertical tail lifting straight up to clear fuselage slots and attachments.
viii. Some airplanes may have an optional tapered shim installed between the vertical stabilizer front spar and the FS 193.06 bulkhead. If one is installed retain it for subsequent reassembly, or if damaged, fabricate a new one using the existing one as a template (see reassembly, below).
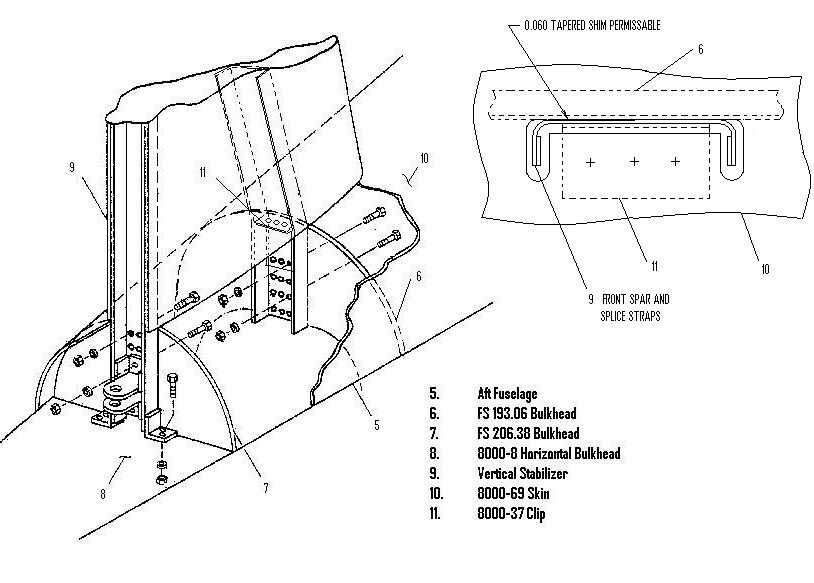
Figure 9
(3). Remove excess paint and clean the areas near the bend in the 9000-3 vertical stabilizer front spar at least 3.0 inches above the bend and to end of part below the bend including the 9000-4 splice plates (Figures 1, 2, and 3) using shop solvents per AC 43.13-1B Chapter 5, Section 5 Table 5-5 as required to prepare the area for inspection in accordance with the inspection method below. Exercise caution so as to not damage the structure or finishes more than required to affect the inspection. Clean and prepare 9000-4 splice plates spanning the spar flange notches and adjacent areas of the spar for close visual inspection.
(4). Visually inspect all (22) fasteners attaching the 9000-4 splice plates to the 9000-3 front spar for condition and security. The fasteners should not be bent, nicked, cracked, or corroded, and should be tight. Remove any suspected fasteners.
(5) Visually inspect the splice plates, the lower 7.5 inches of the spar flanges and the spar web for cracks.
(6) Dye-penetrant inspect both sides of the spar web, the side flange bend radii (fillets) and the side flanges of the 9000-3 spar 2.0 inches above and below the bend on both sides for cracks. Verify crack indications (inside and outside this area) that were discovered in the visual inspections. Extend the dye-penetrant inspection area as indicated by findings. This inspection must be accomplished using the instructions accompanying the dye-penetrant inspection equipment. Use AC 43.13-1B Chapter 5, Section 5 for guidance and ASTM E-1417 as appropriate.
(7). Remediate damage:
i. Blend out minor damage indications (cracks, scratches, corrosion) using hand tools and sandpaper as appropriate to eliminate, verify that remaining indications are cracks.
ii. If a crack is (cracks are) found in the flat areas (away from flange bend radii), then mark the visual end(s) of the crack(s).
1. If the marked crack length is less than or equal to 0.125 inch, then profile notch out the crack (0.0625 min R) or drill out the crack using a #30 (0.1285 inch) drill.
2. If the marked crack is greater than 0.125 inch but less than or equal to 0.250 inch, then stop drill (each end) using a #30 (0.1285 inch) drill, ensuring that the drill hole(s) does (do) not ride into the flange bend radius and that the crack does not extend beyond the stop drill hole(s). Machine out the ligament between the stop drills or to the nearby edge. The notch edges need not be parallel, but should be smooth simulating a V-notch or elliptical hole.
3. If the marked crack is greater than 0.250 inch, then stop drill (each end) using a #30 (0.1285 inch) drill ensuring that the drilled hole(s) does (do) not ride into the flange bend radius and the crack does not extend beyond the stop drill hole(s).
iii. If the crack extends entirely across the spar (as in Figures 2 and 3), then remove fasteners so as to separate the parts. Deburr and smooth the crack edges as much as possible without affecting the fit. Retain the parts for re-installation.
iv. If a crack is (cracks are) found in the flange (fillet) radius (radii), the machine out the crack so as to remove the entire radius (0.19 inch minimum on web and flange) using 0.06R min corner radii in the slot and straight across the fillet at the ends. Optionally, stop drills may be used if they are carefully blended so as not to adversely interact with the bend radius.
v. Clean all parts removing dye-penetrant chemicals in accordance with instructions accompanying the dye-penetrant equipment. Use AC 43.13-1B Chapter 5, Section 5 for guidance and ASTM E-1417 as appropriate and allow to dry.
vi. Coat all newly exposed surfaces with zinc chromate or zinc oxide in accordance with standard repair facility practices. Use AC -13-1B Chapter 6, paragraph 6-40 as a guide. Restore finishes.
(8). If damage was found in the visual or dye-penetrant inspections, then fabricate and install a web repair doubler as described below. If damage is not found, then fabricate and install the repair doubler described below as a preventative modification (alteration).
(9) Fabrication of Repair or Alteration Doubler
i. Fabricate a repair (or alteration) doubler from 0.090 2024-T3 (clad) aluminum alloy as sketched in Figure 10. Use 1AC 43.13-1B Chapter 4, Section 4 and Chapter 6 for guidance.
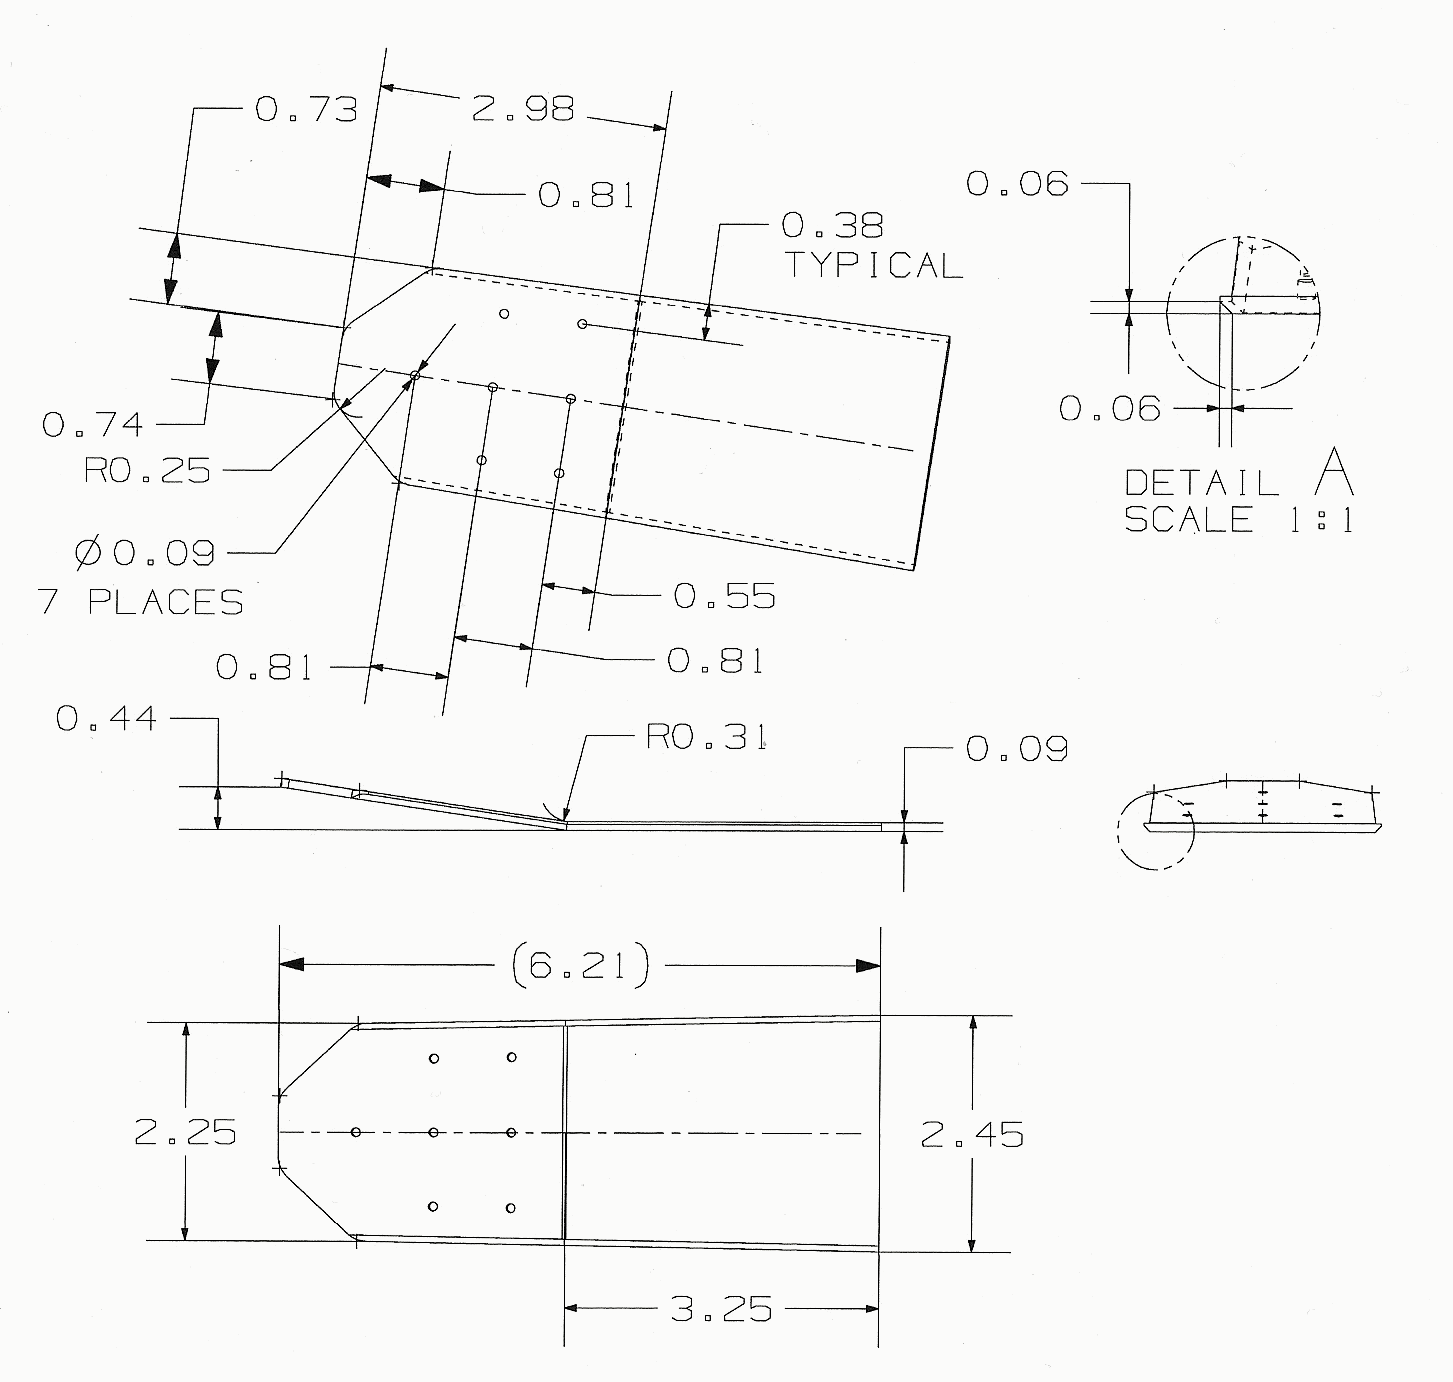
Figure 10
ii. Blend the chamfer run-out at intersection with the upper (left Figure 10) profile. Custom fit the doubler to the aft face of the 9000-3 front spar adjusting the bend angle, position and chamfers as required. Coat with zinc chromate or zinc oxide per AC 43.13-1B Chapter 6, paragraph 6-40, and allow to dry.
(10) Repair or Alteration Doubler Installation
i. If the 9000-4 splice straps were removed, then clean up the holes and re-install them using existing holes in the spar cap as the template to locate the splice straps, and using the same size and type of fasteners (AN470-AD4 rivets) as were removed. If the holes were severely damaged, then drill for and use the next size AN470-AD5 rivet or equivalent. If the spar was severed and the lower section was removed for refurbishment, then install the fasteners above the break first to locate the straps, then install the fasteners below the break using the existing 9000-4 strap as a template.
d. Install the repair/modification doubler onto the 9000-3 front spar:
i. Position the repair/modification doubler onto the aft face of the 9000-3 spar web as it was custom fit during the fabrication process.
ii. Clamp the doubler in place. Using the 9000-3 web holes (below the spar bend) as a template, carefully match drill at least three holes in the doubler and temporarily install at least three AN3-X bolts to locate the doubler, where X is the appropriate grip length for the stack-up including washers under the nut as required.
iii. Using the 0.090 doubler holes as template, drill 0.190 holes in the 9000-3 web and install 7 AN3-X Bolts (or equivalent) using MS21042-3 Nuts and NAS620-10 Washers under the nut (or equivalent), where X is the appropriate grip length for the stack-up including washers as required. Use AC 43.13-1B Chapter 7 for guidance. If not already done, match drill the remaining holes below the spar bend. Remove the temporary fasteners. Remove the clamp.
(11) If the 8000-37 clip was not removed during the disassembly, remove it by carefully drilling out the rivets. Use AC 43.13-1B, paragraph 4-52.b for guidance. Fabricate a new 8000-37 Clip from 2.13 x 2.0 x 0.040 2024-T3 (clad) aluminum alloy. Use AC 43.13-1B Chapter 4, Section 3 paragraph 4-38b, Section 4 paragraphs 4-53 and 4-55 and Chapter 8 for guidance. Use the existing 8000-37 Clip as a template for sizing and for the bend angle, but do not mark or drill the fastener holes until assembly.
(12) Reinstall Removed Structure
Note: Installation procedures are described in the Varga Kachina 2150A Aircraft Maintenance Manual Section 4.4.4.2, 4.4.3.2, 4.4.2.2 and 4.4.1.2 which may be used to supplement the following instructions.
a. Install the Vertical Stabilizer:
i. Install a new seal extrusion (or re-install the old if it is in excellent condition) on the skin lower edges.
ii. Existing hardware may be reused if it is in excellent condition except self-locking nuts and cotter pins must be replaced.
iii. It may be necessary to remove some of the tongue at the u-shaped slot in the 8000-69 skin (Figure 9) accommodating the 9000-3 front spar in order to clear the spar/doubler assembly. Try to maintain 0.190 inch minimum edge distance from existing holes, but shorter edge distance is permissible. Coat newly exposed material with zinc chromate or zinc oxide using repair facility standard procedures, and allow to dry. Use AC 43.13-1B Chapter 6, paragraph 6-40 for guidance.
iv. Carefully fit the vertical stabilizer into position so that existing holes in the front and rear spars align with the corresponding holes in the bulkheads.
v. Use tapered drifts and/or vertical stabilizer supports to ensure 100% alignment. Support the tail in position.
vi. An optional tapered shim may have been installed at the FS 193.06 bulkhead to maintain vertical tail incidence (Figure 9). If the shim was installed, re-install the existing one, or if it was damaged in tail removal, fabricate a new one using the existing one as a template and position it as required. If a new shim is installed, drill the shim to match the existing hole pattern only after the vertical tail is properly positioned and the shim is snug.
vii. Locate and mark the new 8000-37 clip to match existing holes in the 8000-69 fuselage skin and rivet in place. This may be done in several ways. Suggested methods include using inked cotton balls stuffed into the existing holes as markers, or "bluing" the surface, or removing the tail sufficiently to gain access to the clip holes (if tail is completely removed, a temporary 0.154 inch shim may be temporarily used to simulate the spar/doubler stack-up to locate the forward face of the clip, include the tapered shim if used). If the tail is sufficiently removed, three AN470-AD4 rivets may be used. Cherry rivets or equivalent "blind fasteners" may be optionally used. New holes located aft or forward of the existing holes in the 8000-69 skin tongue may be used. Be careful of dimensions so as to ensure positive engagement of the fasteners. While short edge distance or close hole spacing is permitted, exercise care so as to affect a secure attachment.
viii. Reinstall or recheck the alignment of all fasteners holes in the front and rear spar using tapered drifts and/or vertical stabilizer supports as required.
ix. Install all NAS 1103 bolts attaching the rear spar to the FS 206.38 bulkhead and the 8000-8 horizontal bulkhead using new hardware of the same type and size as was removed. Note that the bolts are different lengths. Install snug (not torqued). If the spar or bulkhead holes were damaged so as to require clean-up, then if resulting hole is less than 0.196 and adjacent holes are nominal size (0.189 inch for NAS 1103, or similar fit for oversized bolts) then install NAS1103 or equivalent. Else, drilling for and installing NAS1104 bolts (or up to one size over the size removed at individual locations as applicable) is permissible.
x. Using the FS 193.06 bulkhead (and spar web) holes as a template, drill the top 3 holes through the 8000-37 clip. Install the NAS 1103-X bolts (12 bolts) attaching the front spar to the FS 193.06 bulkhead (through the tapered shim if installed) using new bolts (0.090 longer grip than those removed) if required plus nuts and washers of the same type and size as were removed.
xi. Install all fasteners snug (Varga Maintenance Manual Figure 4.14, reproduced here as Figure 9, may be used for guidance), then torque nuts for (including front spar and rear spar attachments). Use Varga Maintenance Manual Table II.II (Figure 11) for guidance:
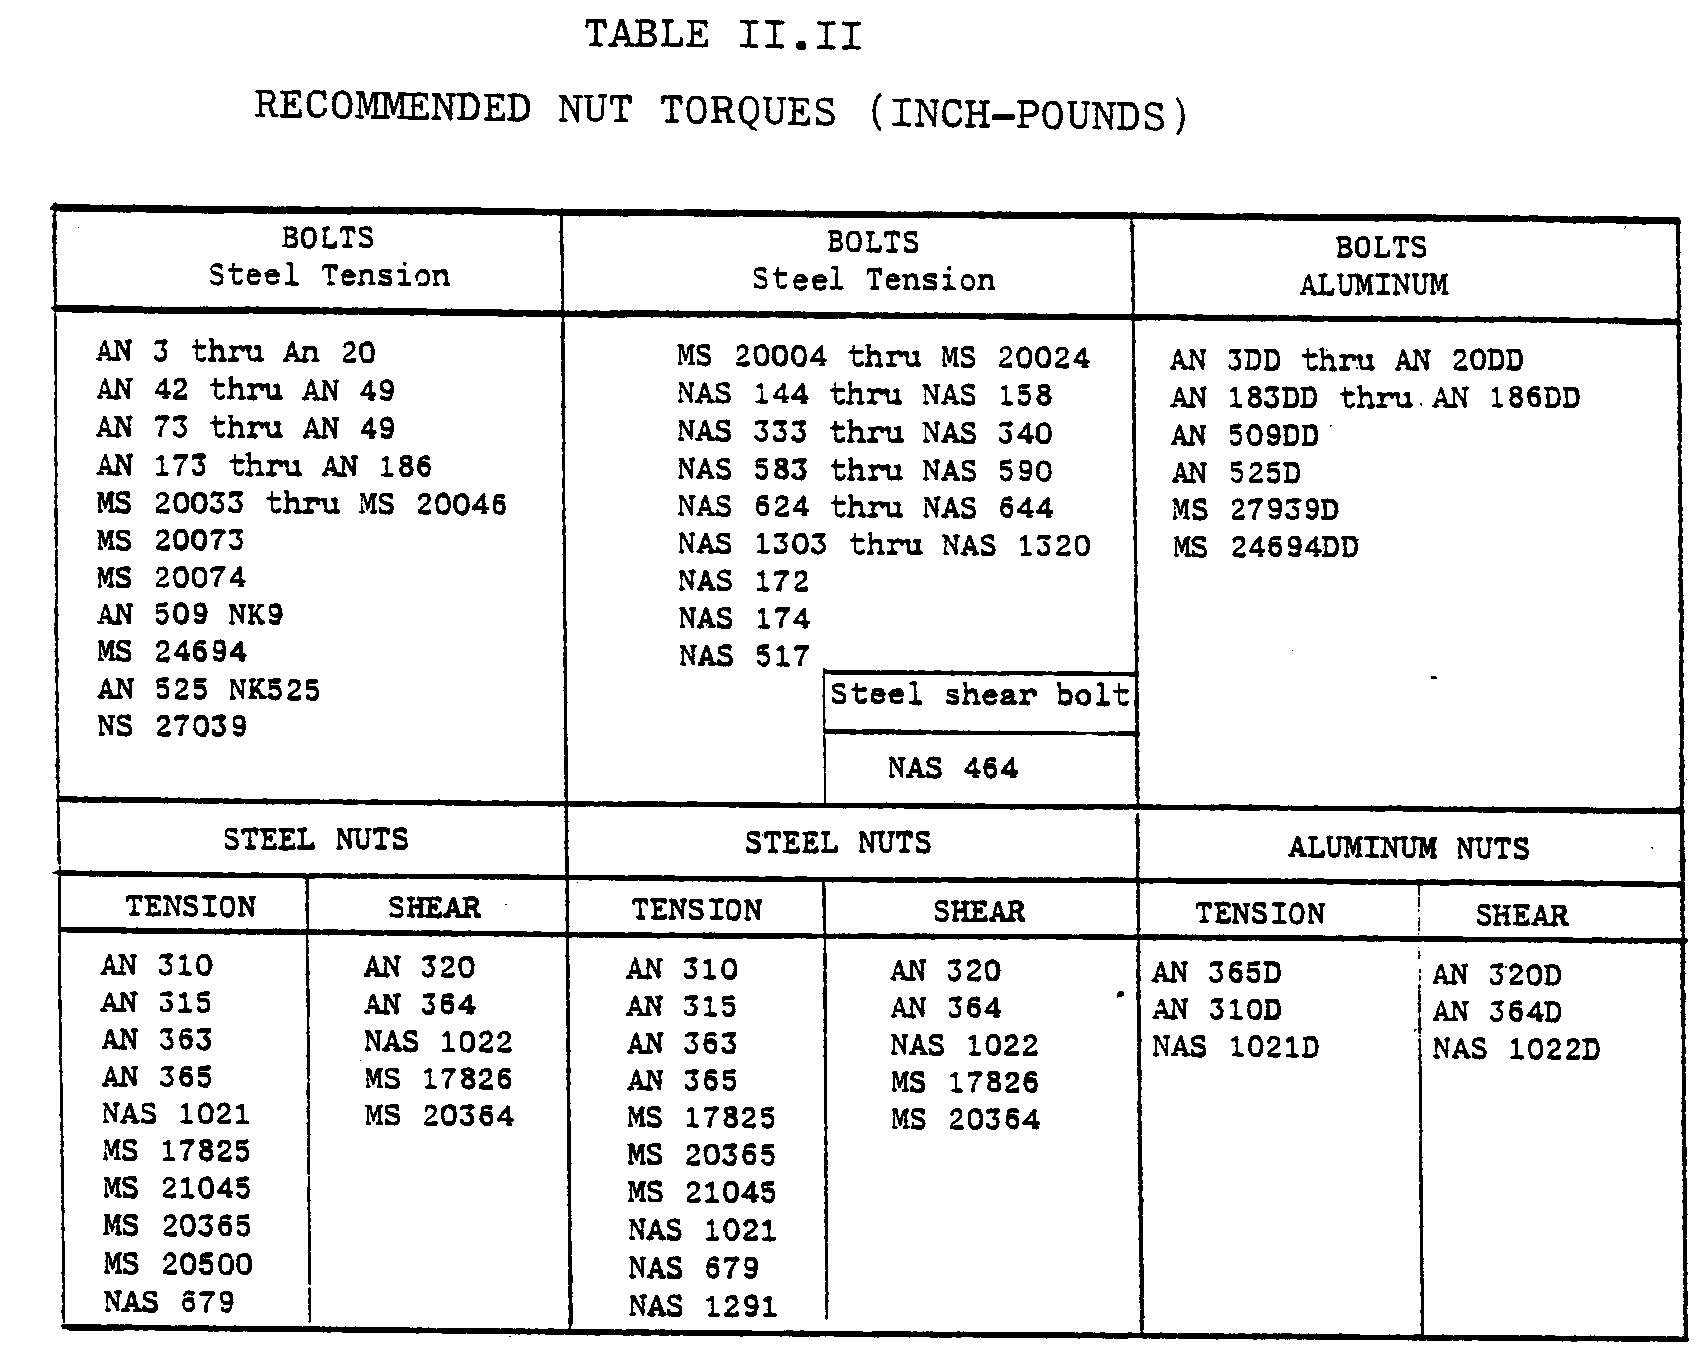
Figure 11
b. Install the Rudder
i. Installation is opposite of removal. Install rudder hinge pins snug, but do not overly pinch clevises (Figure 12). Use new cotter pins.
ii. Reattach the rudder control cables (Figure 7).
iii. Install Rudder Hinge and Rudder Cable Bolts snug, but do not overly pinch the clevises or shackle. Use new cotter pins.
iv. If the rudder balance weight was removed, reinstallation is opposite of removal (Figure 7). Torque nuts using Varga Maintenance Manual Table II.II (Figure 11) for guidance.
v. Reinstall the vertical stabilizer tip. Installation is opposite of removal.
vi. Inspect the rudder for operation and travel after installation, that there is no binding or misrouting of the cables in the fairleads or pulleys (Figure 7), and that rudder pedal springs are providing tension. Rudder should move freely 29º ±1º each way. Adjust control stops on the FS 206.38 bulkhead as required. The Varga Maintenance Manual Figure 5.6 and 5.7 (Figure 13) provides instructions for making a template and adjusting the stops. Note that some models have double nuts and some have nut plates for the stop screws.
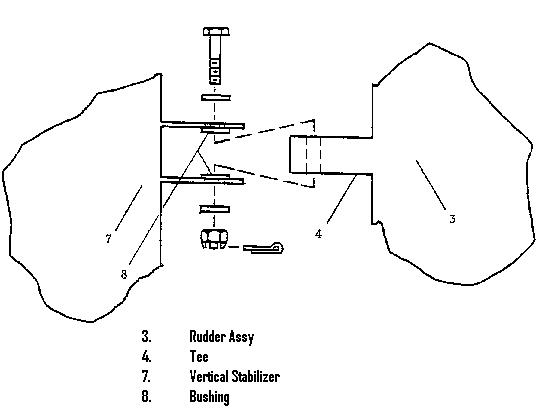
Figure 12
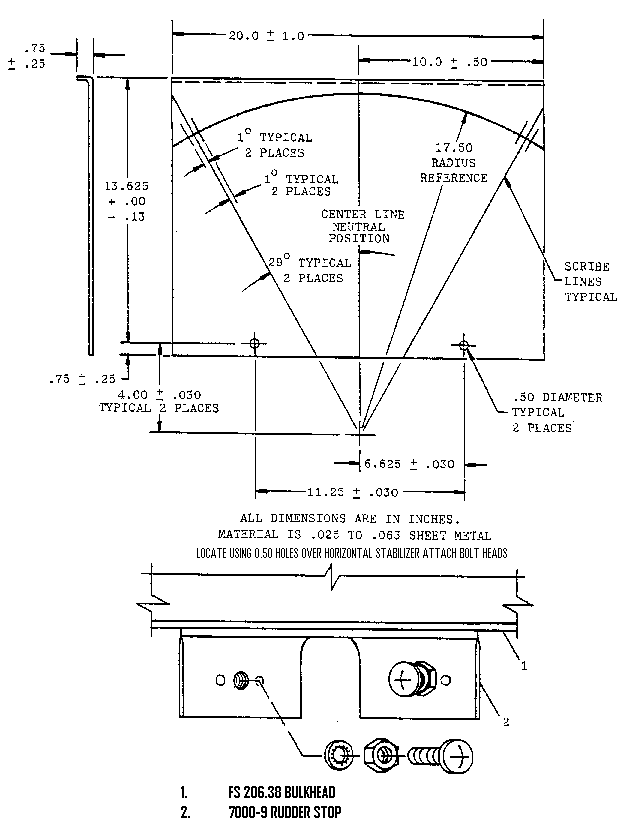
Figure 13 a
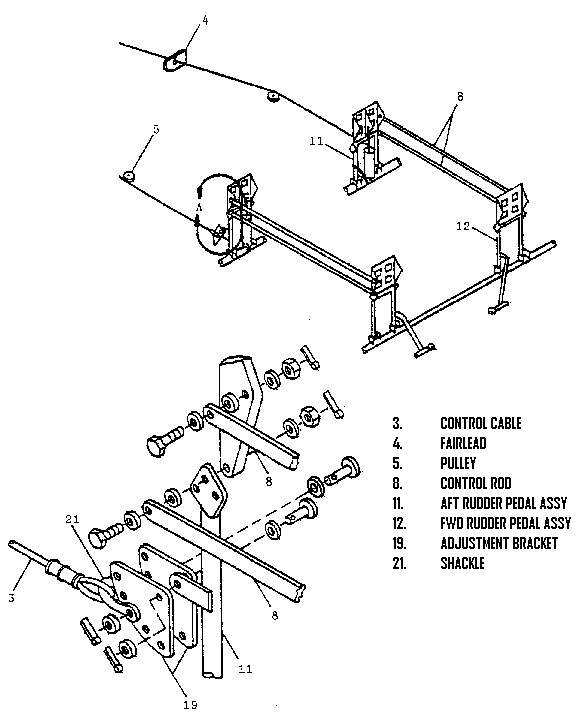
Figure 13b
c. Install the Horizontal Stabilizer
i. Installation is opposite of removal (Figure 8). Ensure that fixed surface spacers are in place prior to installing the bolts.
ii. Torque nuts using the Varga Maintenance Manual Table II.II (Figure 11) for guidance.
iii. Install new cotter pins.
d. Install the Elevator
i. Whether the elevator was removed from the horizontal stabilizer during disassembly or not, perform the relevant steps below.
ii. Installation is opposite of removal.
iii. Install new cotter pins.
iv. Reinstall the elevator static balance weights to the elevator bell-crank (Figure 6). Torque nuts using the Varga Maintenance Manual Table II.II (Figure 11) for guidance.
v. Reattach the elevator control tube and Elevator Trim Control Tube to the elevator horn (Figure 6). Install bolts snug, but do not overly pinch clevises. Use new cotter pins.
vi. Reinstall the Tail Cone. Installation is opposite of removal.
vii. When re-attaching the tail light wire knife splice use a new clear vinyl insulating sleeve tied-off on each end using waxed chord secured with a square knot (Figure 5).
viii. If the tail light wire was cut during removal, then slip a clear vinyl sleeve onto one end and splice using either a crimped splice or a knife splice similar to the existing knife splice – protect with a clear vinyl sleeve tied off on each end with waxed chord secured with a square knot (Figure 5). If sufficient slack is not available to affect the splice, then replace one section with wire of the same size and type and crimp-splice and protect in two places as described above – retain at least one knife splice as in the original configuration.
ix. Verify that elevator travel is free between 16º±1º up and 18º±1º down. Adjust control stops on the forward and aft control sticks as required (Figure 14, items 11 and 12). For elevator rigging, at neutral the Bellcrank at FS 158.0 and the forward stick should be vertical and the elevator should be in its static balance condition so that the elevator upper surface (forward-to-aft) is 2.5° ± 1° below a horizontal datum.
x. Verify tail light operation. Trouble-shoot and re-splice as required.

Figure 14
e. Reconnect the VOR Antenna coax cable if installed. If the cable was cut during removal of the vertical stabilizer, then repair upon using a matched set of BNC cable connectors using procedures accompanying the connectors. Verify proper VOR operation. Troubleshoot and re-splice as required.
f. Recheck that all fasteners are properly torqued, that all cotter pins are installed and that safety wires are used as applicable. Reinstall the fuselage side access panel.
g. Reinstall the access panel on the fuselage side panel (Figure 4 Item 17).